

一、硬件环境
- 上位机:Windows10 PC
- 下位机:AB (Allen-Bradley)CompactLogix 控制器
二、libplctag介绍
1. libplctag
libplctag是一个可以使用EtherNet/IP或Modbus TCP对PLC标签进行读写的库,使用C编写,它是开源(MPL 2.0)且跨平台(支持Linux、Windows、macOS)的。项目托管在GitHub,可以前往了解:https://github.com/libplctag/libplctag。
2. libplctag.NET
libplctag.NET是一个对libplctag的C#.NET包装器,也是开源的(MPL 2.0),托管在GitHub:https://github.com/libplctag/libplctag.NET。由于上位机使用C#编写,因此实际上是使用这个wrapper,版本是1.0.6.0。
3. 读写标签
1. 读写简单标签
直接看libplctag.NET提供的例程即可:
var myTag = new Tag<DintPlcMapper, int>()
{
    //Name of tag on the PLC, Controller-scoped would be just "SomeDINT"
    Name = "SomeProgram.SomeDINT",
    //PLC IP Address
    Gateway = "10.10.10.10",
    //CIP path to PLC CPU. "1,0" will be used for most AB PLCs
    Path = "1,0",
    //Type of PLC
    PlcType = PlcType.ControlLogix,
    //Protocol
    Protocol = Protocol.ab_eip,
    //A global timeout value that is used for Initialize/Read/Write methods
    Timeout = TimeSpan.FromMilliseconds(TIMEOUT),
};
myTag.Initialize();
myTag.Read();
int myDint = myTag.Value;
Console.WriteLine($"Initial Value: {myDint}");
myDint++;
myTag.Value = myDint;
myTag.Write();
myTag.Read();
myDint = myTag.Value;
Console.WriteLine($"Final Value: {myDint}");
下面对上面的代码进行详细说明:
首先是实例化一个Tag实例,var myTag = new Tag<DintPlcMapper, int>()会创建一个标签实例myTag,这个标签在PLC处的数据类型是DINT,在C#端为int,因此要做一个绑定, DintPlcMapper这个类就是对int类型做了映射关系,使得我们在操作PLC中的DINT数据时,就像在操作int对象一样。其中涉及对int对象的编码和解码,将在后面做详细介绍,这里先列出支持的几种简单数据类型:
- bool,对应PLC中的BOOL类型,占1bit,使用BoolPlcMapper进行映射
- int,对应PLC中的DINT类型,占4bytes,使用DintPlcMapper进行映射
- short,对应PLC中的INT类型,占2bytes,使用IntPlcMapper进行映射
- long,对应PLC中的LINT类型,占8bytes,使用LintPlcMapper进行映射
- double,对应PLC中的LREAL类型,占8bytes,使用LrealPlcMapper进行映射
- float,对应PLC中的REAL类型,占4bytes,使用RealPlcMapper进行映射
- sbyte,对应PLC中的SINT类型,占1bytes,使用SintPlcMapper进行映射
- string,对应PLC中的STRING类型,占88bytes(不同类型的PLC可能有差异),使用StringPlcMapper进行映射
Name属性:标签名称。注意到这里有个“.”,将在下文讲解。
Gateway属性:下位机PLC的IP地址和端口号,EIP协议默认端口号为44818,这里省略了端口号。如果有修改端口号的需求,应该这样写:Gateway = "10.10.10.10:44818"。
Path属性:CIP协议的路由路径和CPU插槽,这里赋值为”1,0″即可。
PlcType属性:枚举值,根据下位机PLC属性进行赋值,由于这里使用的是AB的 CompactLogix 控制器,因此为PlcType.ControlLogix。
Protocol属性:通讯协议类型,枚举值,可以选择ab_eip或modbus_tcp。
Timeout属性:初始化标签的超时值,按默认即可。
创建实例之后,就可以使用Initialize方法对其进行初始化,之后修改标签变量值并写入PLC。写入标签使用Write(),读取标签使用Read()。
2. 读写标签集合
同样,参考libplctag.NET提供的例程,这里以一维数组标签为例:
var myArrayTag = new Tag<DintPlcMapper, int[]>()
{
    //Name of tag on the PLC, Controller-scoped would be just "SomeDINT"
    Name = "SomeProgram.SomeDINT",
    //PLC IP Address
    Gateway = "10.10.10.10",
    //CIP path to PLC CPU. "1,0" will be used for most AB PLCs
    Path = "1,0",
    //Type of PLC
    PlcType = PlcType.ControlLogix,
    //Protocol
    Protocol = Protocol.ab_eip,
    //Dimensions of Value if it is an array
    //Ex. {2, 10} for a 2 column, 10 row array
    //Non-arrays can use null (default)
    ArrayDimensions = new int[] { 1, 5 },
    //A global timeout value that is used for Initialize/Read/Write methods
    Timeout = TimeSpan.FromMilliseconds(TIMEOUT),
};
myArrayTag.Initialize();
myArrayTag.Read();
for (int i = 0; i < 5; i++)
{
    int arrayDint = myArrayTag.Value[i];
    Console.WriteLine($"Initial Value[{i}]: {arrayDint}");
}
myArrayTag.Value = new int[] { 1, 2, 3, 4, 5 };
myArrayTag.Write();
myArrayTag.Read();
for (int i = 0; i < 5; i++)
{
    int arrayDint = myArrayTag.Value[i];
    Console.WriteLine($"Final Value[{i}]: {arrayDint}");
}和简单标签不同的是,这里将int[]数组映射到PLC中,该数组的长度为5,ArrayDimensions = new int[] { 1, 5 }代表这是一个1列5行的标签,相当于一个长度为5的一维数组。的其他操作与简单标签的读写一样。如果改为二维数组,那么应该将:int[]改为int[,],ArrayDimensions = new int[] { 1, 5 }改为ArrayDimensions = new int[] { 2, 5 },代表二维数组,每一维的长度为5。之后可以通过myArrayTag.Value[i, j]进行访问。三维数组同理。
3. 读写标签集合中的特定位置的元素
在上一节中,我们读写了一维数组标签,在代码中,我们读写了整个数组,而有时候,我们可能只想要读写改标签中某个位置的的值,那么可以这样写:
var myTag = new Tag<DintPlcMapper, int>()
{
    //Name of tag on the PLC, Controller-scoped would be just "SomeDINT"
    Name = "SomeProgram.SomeDINT[0]",
    //PLC IP Address
    Gateway = "10.10.10.10",
    //CIP path to PLC CPU. "1,0" will be used for most AB PLCs
    Path = "1,0",
    //Type of PLC
    PlcType = PlcType.ControlLogix,
    //Protocol
    Protocol = Protocol.ab_eip,
    //A global timeout value that is used for Initialize/Read/Write methods
    Timeout = TimeSpan.FromMilliseconds(TIMEOUT),
};
myTag.Initialize();
myTag.Read();
int myDint = myTag.Value;
Console.WriteLine($"Initial Value: {myDint}");
myDint++;
myTag.Value = myDint;
myTag.Write();
myTag.Read();
myDint = myTag.Value;
Console.WriteLine($"Final Value: {myDint}");
写法也很简单,只要使用中括号[]访问指定位置即可。
4. 读取结构体标签
前两个部分都是介绍基本数据类型的标签读写操作。在PLC中可以创建结构体标签,本段将介绍如何读写PLC中的结构体标签。以自带的自定义结构体TIMER为例说明:
首先在PLC中创建一个名为my_timer的TIMER类型的结构体,事实上,该结构体的内部构造应为:
名称                    DataType
my_timer                TIMER
  PRE                   DINT
  ACC                   DINT
  EN                    BOOL
  TT                    BOOL
  DN                    BOOL
可以看到TIMER结构体有5个基本数据类型成员。 libplctag.NET提供了自定义类型AbTimer和映射类TimerPlcMapper,我们可以像前面对基本数据类型标签读写的那样TIMER标签进行读写。 AbTimer和TimerPlcMapper的源码如下:
public class AbTimer
{
    public int Preset { get; set; }
    public int Accumulated { get; set; }
    public bool Enabled { get; set; }
    public bool InProgress { get; set; }
    public bool Done { get; set; }
}

public class TimerPlcMapper : PlcMapperBase<AbTimer>
{

    public override int? ElementSize => 12;

    public override AbTimer Decode(Tag tag, int offset)
    {

        // Needed to look at RsLogix documentation for structure of TIMER
        var DINT2 = tag.GetInt32(offset);
        var DINT1 = tag.GetInt32(offset + 4);
        var DINT0 = tag.GetInt32(offset + 8);

        // The third DINT packs a few BOOLs into it
        var bitArray = new BitArray(new int[] { DINT2 });

        var timer = new AbTimer
        {
            Accumulated = DINT0,         // ACC
            Preset = DINT1,              // PRE
            Done = bitArray[29],         // DN
            InProgress = bitArray[30],   // TT
            Enabled = bitArray[31]       // EN
        };

        return timer;

    }

    public override void Encode(Tag tag, int offset, AbTimer value)
    {
        var DINT0 = value.Accumulated;
        var DINT1 = value.Preset;

        var asdf = new BitArray(32);
        asdf[29] = value.Done;
        asdf[30] = value.InProgress;
        asdf[31] = value.Enabled;
        var DINT2 = BitArrayToInt(asdf);

        tag.SetInt32(offset, DINT2);
        tag.SetInt32(offset + 4, DINT1);
        tag.SetInt32(offset + 8, DINT0);

    }

    static int BitArrayToInt(BitArray binary)
    {
        if (binary == null)
            throw new ArgumentNullException("binary");
        if (binary.Length > 32)
            throw new ArgumentException("Must be at most 32 bits long");

        var result = new int[1];
        binary.CopyTo(result, 0);
        return result[0];
    }
}
可以看到C#中的AbTimer类与PLC中的TIMER结构体是可以对应起来的,那么重点讲解放在TimerPlcMapper这个类中。
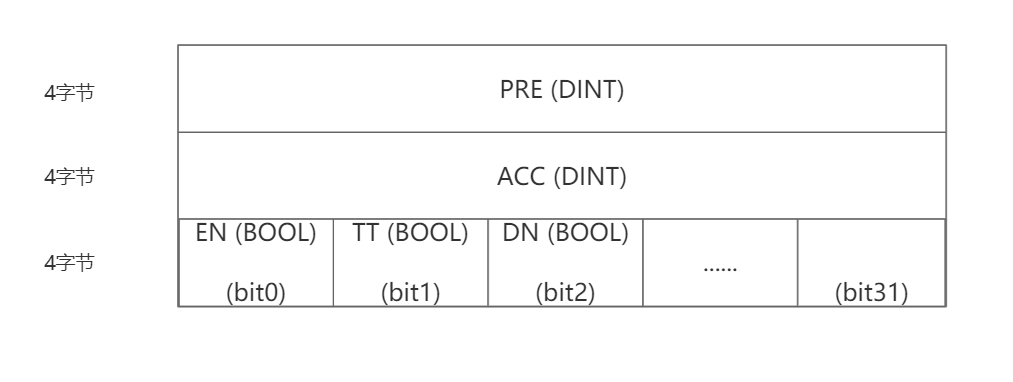
ElementSize:表示该数据类型在PLC中占用多少字节的内存,可以看到TIMER占用12个字节,那么为什么是12呢?让我们接着往下看编码函数Encode(),可以看到AbTimer中的Preset和Accumulated这两个int类型的成员各占4个字节,而其余三个bool成员Enabled、InProgress和Done个占用1bit,三者合计占用1个字节。
这是因为int类型在PLC中对应DINT类型,占用4个字节,而bool类型只有True/False的取值范围,也就是0/1,因此用1bit就可以表示,因此在PLC中它只占用1bit。
那么为什么3个bit却要占用4个字节呢,1个字节不就够了吗?事实上,在PLC中遵循”4字节对齐”的编码规则,因此即使1个字节足够表示这三个bool类型变量,在PLC的内存中它们也是要占用4个字节的。在本文的后面,将提供几个例子着重介绍”4字节对齐”规则。用示意图表示:
解码函数Decode()就是Encode()的逆过程,在这里不介绍了,看下源码就可以了。
于是,在客户端中我们可以这样对结构体TIMER标签进行读写:
var myTag = new Tag<TimerPlcMapper, AbTimer>()
{
    //Name of tag on the PLC
    Name = "my_timer",
    //PLC IP Address
    Gateway = "10.10.10.10",
    //CIP path to PLC CPU. "1,0" will be used for most AB PLCs
    Path = "1,0",
    //Type of PLC
    PlcType = PlcType.ControlLogix,
    //Protocol
    Protocol = Protocol.ab_eip,
    //A global timeout value that is used for Initialize/Read/Write methods
    Timeout = TimeSpan.FromMilliseconds(TIMEOUT),
};
myTag.Initialize();
myTag.Read();
AbTimer timer = myTag.Value;
Console.WriteLine($"Initial Value: Accumulated: {timer.Accumulated}, Preset : {timer.Preset }, Enabled : {timer.Enabled }, InProgress : {timer.InProgress }, Done : {timer.Done },");
myTag.Value = new AbTimer() { Preset = 1111, Accumulated = 222, Enabled = true, InProgress = true, Done = true };
myTag.Write();
myTag.Read();
timer = myTag.Value;
Console.WriteLine($"Initial Value: Accumulated: {timer.Accumulated}, Preset : {timer.Preset }, Enabled : {timer.Enabled }, InProgress : {timer.InProgress }, Done : {timer.Done },");
5. 读取结构体标签中某个成员
前面在介绍Tag的Name属性时,有提到有些标签名中含有“.”,事实上我们可以通过这样的方式访问结构体中的某个特定的成员,比如对my_timer标签中的ACC进行读写:
var myTag = new Tag<DintPlcMapper, int>()
{
    //Name of tag on the PLC
    Name = "my_timer.ACC",
    //PLC IP Address
    Gateway = "10.10.10.10",
    //CIP path to PLC CPU. "1,0" will be used for most AB PLCs
    Path = "1,0",
    //Type of PLC
    PlcType = PlcType.ControlLogix,
    //Protocol
    Protocol = Protocol.ab_eip,
    //A global timeout value that is used for Initialize/Read/Write methods
    Timeout = TimeSpan.FromMilliseconds(TIMEOUT),
};
myTag.Initialize();
myTag.Read();
int accumulated = myTag.Value;
Console.WriteLine($"Accumulated Initial Value: {accumulated}");
accumulated++;
myTag.Value = accumulated;
myTag.Write();
myTag.Read();
accumulated = myTag.Value;
Console.WriteLine($"Accumulated Final Value: {accumulated}");其实就是对读取一个DINT类型的标签。关键就在于标签名Name,我们要读取TIMER类型的标签my_timer中的ACC,那么就应该myTag.Name = "my_timer.ACC"
6. 读取自定义结构体标签与“4字节对齐”规则
很多时候,PLC自带的结构体并不能够满足我们的需要,这时,我们就得在PLC中自定义结构体,同时在上位机应该编写这一结构体对应的自定义类型和映射类。
首先,还是以libplctag.NET提供的例程讲解:
一开始要在PLC中创建一个自定义结构体标签,标签的DataType为SEQ,其内部结构为:
名称 DataType
my_seq SEQ
STEP_NO DINT
NEXT_STEP DINT
COMMAND DINT
IDLE_STEP DINT
FAULT_STEP DINT
INIT_STEP DINT
STOP BOOL
HOLD BOOL
FAULT BOOL
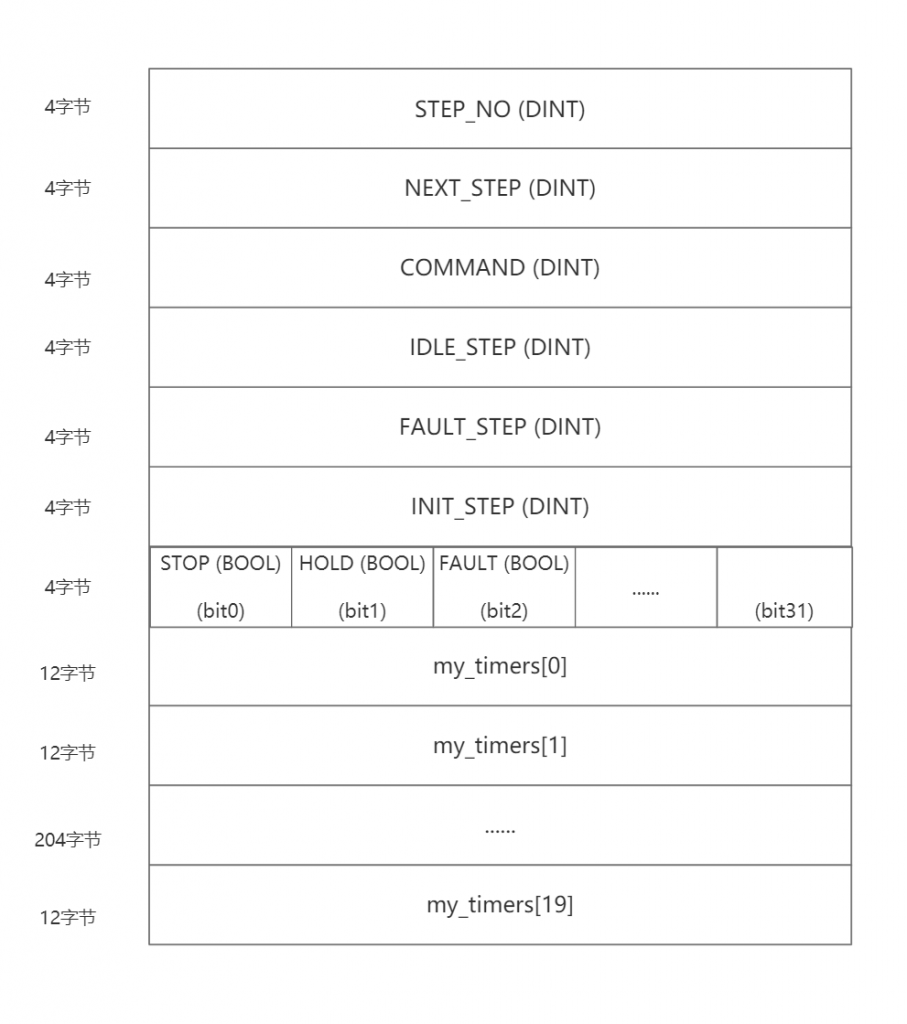
my_timers TIMER[20]根据前文的分析,我们知道这个结构体的前6个DINT类型的成员各占用4个字节,接下来的3个BOOL类型的成员共同占用4个字节,20个TIMER类型的成员各占用12字节,所以SEQ结构体一共占用6*4+4+20*12=268个字节的内存。如下图所示:
根据这些信息,我们就可以编写自定义类型Sequence和SequencePlcMapper了:
/// <summary>
/// This is an example plcMapper for a User Defined Type (UDT)
/// </summary>
/// <remarks>
///
/// This type was developed for use on a CompactLogix controller
/// and is included to show how to develop a custom plcMapper
///
/// Step_No     DINT            4 bytes
/// Next_Step   DINT            4 bytes
/// Command     DINT            4 bytes
/// Idle_Step   DINT            4 bytes
/// Fault_Step  DINT            4 bytes
/// Init_Step   DINT            4 bytes
/// Stop        BOOL            \
/// Hold        BOOL            |-- packed into 4 bytes
/// Fault       BOOL            /
/// Timer       TIMER[20]       12 bytes x 20 = 240 bytes
/// ------------------------------------------------------
/// Total size = 268 bytes
///
///
/// In order to understand how the structure is encoded
/// we need to inspect the underlying buffer.
/// Use GetBuffer() from the tag object
/// to access to the raw bytes. Then, use your PLC
/// programming software to manually modify values and see
/// how the raw bytes change.
///
/// If you are accessing an array of your UDT, try starting
/// out by addressing only one element of this array (i.e.
/// set ElementCount = 1).
///
/// </remarks>
public class SequencePlcMapper : PlcMapperBase<Sequence>, IPlcMapper<Sequence>, IPlcMapper<Sequence[]>
{


    // Because our UDT has an unchanging ElementSize,
    // provide the value so the tag constructor can use it
    // If ElementSize = null, this will not be passed to the
    // Tag constructor
    public override int? ElementSize => 268;


    // This function is used to decode the binary buffer
    // into a CLR data transfer object
    // The function is called once per array element, so we only
    // need to decode one array element at a time.
    override public Sequence Decode(Tag tag, int offset)
    {


        // If our UDT has a size that does not change, we can set this based on ElementSize
        // Some types have an ElementSize that varies with it's contents (e.g. STRING on some controllers)
        // Those types must wait until they know the actual elementSize before returning it
        //elementSize = ElementSize.Value;


        // Plain DINT objects
        //
        // Note that the buffer access is always offset
        // This is so that our PlcMapper can be used in both
        // Single Values or Arrays
        var DINT0 = tag.GetInt32(offset + 0);
        var DINT1 = tag.GetInt32(offset + 4);
        var DINT2 = tag.GetInt32(offset + 8);
        var DINT3 = tag.GetInt32(offset + 12);
        var DINT4 = tag.GetInt32(offset + 16);
        var DINT5 = tag.GetInt32(offset + 20);


        // Our BOOLs are packed into this object.
        // I've chosen to make use of the BitArray class
        // which takes an integer array or byte array
        var PACKED_BOOLS = tag.GetInt32(offset + 24);
        var bools = new BitArray(new int[] { PACKED_BOOLS });


        // We can make use of other PlcMappers!
        // This means that if our UDT contains other structures (or UDTs)
        var timerPlcMapper = new TimerPlcMapper()
        { PlcType = this.PlcType };                     // Pass the PlcType through to this PlcMapper just in case it's behaviour depends on PlcType


        var TIMERS = new AbTimer[20];
        for (int ii = 0; ii < 20; ii++)
        {
            var timerOffset = offset + 28 + ii * timerPlcMapper.ElementSize.Value;
            TIMERS[ii] = timerPlcMapper.Decode(tag, timerOffset);
        }


        // We now have all of our objects Decoded
        // and can instantiate our Plain Old Class Object (POCO)
        // With the appropriate values
        return new Sequence()
        {
            Step_No = DINT0,
            Next_Step = DINT1,
            Command = DINT2,
            Idle_Step = DINT3,
            Fault_Step = DINT4,
            Init_Step = DINT5,
            Stop = bools[0],
            Hold = bools[1],
            Fault = bools[2],
            Timer = TIMERS
        };

    }


    override public void Encode(Tag tag, int offset, Sequence value)
    {

        var DINT0 = value.Step_No;
        var DINT1 = value.Next_Step;
        var DINT2 = value.Command;
        var DINT3 = value.Idle_Step;
        var DINT4 = value.Fault_Step;
        var DINT5 = value.Init_Step;

        var bools = new BitArray(32);
        bools[0] = value.Stop;
        bools[1] = value.Hold;
        bools[2] = value.Fault;

        var DINT6 = BitArrayToInt(bools);

        tag.SetInt32(offset + 0, DINT0);
        tag.SetInt32(offset + 4, DINT1);
        tag.SetInt32(offset + 8, DINT2);
        tag.SetInt32(offset + 12, DINT3);
        tag.SetInt32(offset + 16, DINT4);
        tag.SetInt32(offset + 20, DINT5);
        tag.SetInt32(offset + 24, DINT6);

        var timerPlcMapper = new TimerPlcMapper();
        for (int ii = 0; ii < 20; ii++)
        {
            var timerOffset = offset + 28 + ii * timerPlcMapper.ElementSize.Value;
            timerPlcMapper.Encode(tag, timerOffset, value.Timer[ii]);
        }

    }

    static int BitArrayToInt(BitArray binary)
    {
        if (binary == null)
            throw new ArgumentNullException(nameof(binary));
        if (binary.Length > 32)
            throw new ArgumentException("Must be at most 32 bits long");

        var result = new int[1];
        binary.CopyTo(result, 0);
        return result[0];
    }
}


/// <summary>
/// Data Transfer Object for the User Defined Type.
/// </summary>
///
/// <remarks>
/// Although it is not absolutely required, it is best
/// practice to here use the same naming and casing as is used
/// in the User Defined Type in the PLC, and to keep these
/// classes as pure Data Transfer Objects.
/// </remarks>
///
public class Sequence
{
    public int Step_No { get; set; }
    public int Next_Step { get; set; }
    public int Command { get; set; }
    public int Idle_Step { get; set; }
    public int Fault_Step { get; set; }
    public int Init_Step { get; set; }
    public bool Stop { get; set; }
    public bool Hold { get; set; }
    public bool Fault { get; set; }
    public AbTimer[] Timer { get; set; }
}
在C#部分,自定义类型Sequence中各成员的命名和顺序并不影响最终结果(事实上libplctag.NET提供的例程是并不是以上顺序,而是我进行了调整,以方便阅读),只要注意在编码Encode()和解码Decode()函数中,要与PLC中的结构体SEQ对应即可。
接下来我们稍微调整一下PLC中的SEQ结构体:
名称 DataType
my_seq SEQ
STOP BOOL
STEP_NO DINT
NEXT_STEP DINT
HOLD BOOL
FAULT BOOL
COMMAND INT
IDLE_STEP INT
FAULT_STEP INT
INIT_STEP DINT
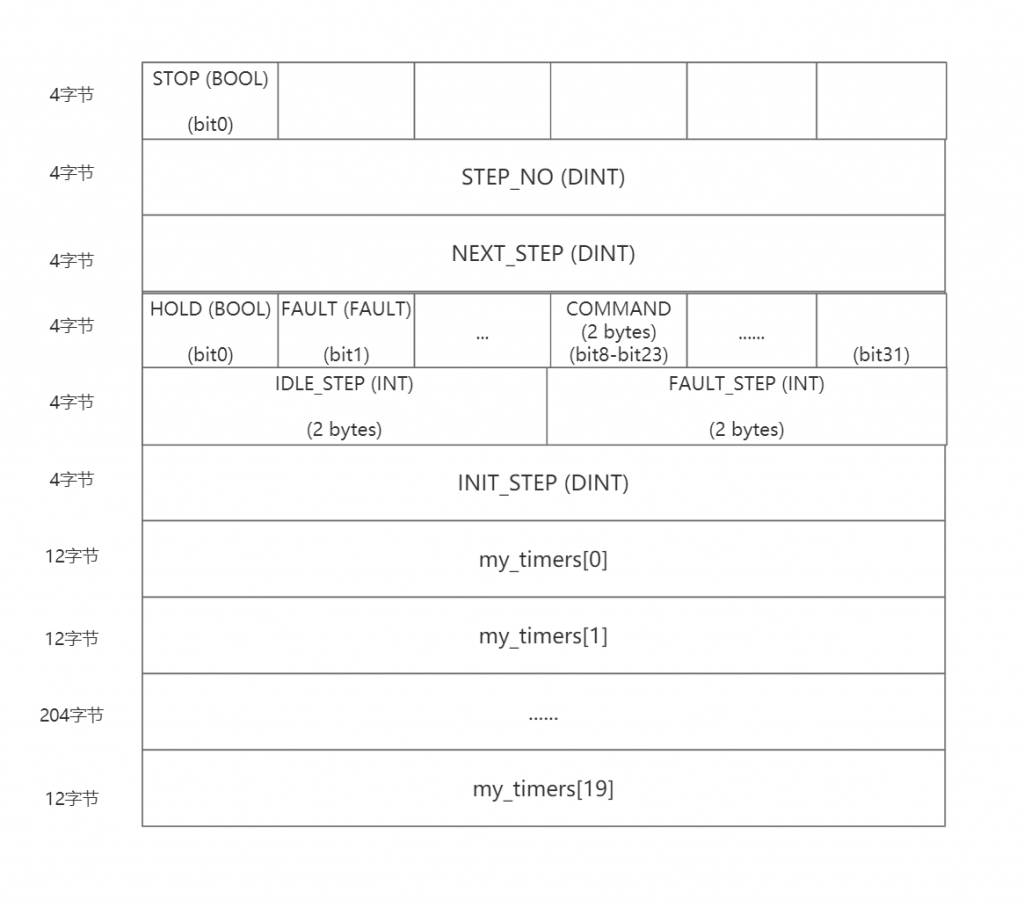
my_timers TIMER[20]我们将PLC中结构体成员的顺序做了调整,同时将COMMAND、IDLE_STEP、FAULT_STEP修改为INT类型。接下来我们一步一步分析:
首先,是一个BOOL类型的STOP,使用一个bit就可以存储,接下来是一个DINT类型的STEP_NO,它需要4个字节的空间存储,后面空余的31个bit不足以存储它,因此BOOL类型的STOP独占4个字节内存,DINT类型的STEP_NO和NEXT_STEP各占4个字节。
接下来是两个BOOL类型,可以用2个bit存储,剩余30个bit,3个字节多一点,它们俩后是一个INT类型的COMMAND,占2个字节16bit,可以放得下因此HOLD、FAULT和COMMAND共同占用4个字节。这里要注意, INT类型的COMMAND 并不是紧挨着FAULT之后的那个bit存储的,而是会在下一个字节的起始位置开始存储,因为字节是用于存储的最小单位,bit不是。
然后是INT类型的IDLE_STEP占两个字节,剩余2个字节刚好够存储INT类型的FAULT_STEP,因此INT类型的IDLE_STEP和FAULT_STEP一起占4个字节,接着的DINT类型的INIT_STEP占4个字节。
最后my_timers和原来一样,20个TIMER类型的成员各占用12个字节。
于是,新的SEQ结构体共占用4+2*4+4+4+4+20*12=264个字节的内存。 如下图所示:
根据这些信息,我们就可以修改自定义类型Sequence和SequencePlcMapper了:
/// <summary>
/// This is an example plcMapper for a User Defined Type (UDT)
/// </summary>
/// <remarks>
///
/// This type was developed for use on a CompactLogix controller
/// and is included to show how to develop a custom plcMapper
///
/// Stop        BOOL            packed into 4 bytes
/// Step_No     DINT            4 bytes
/// Next_Step   DINT            4 bytes
/// Hold        BOOL           \
/// Fault       BOOL           |-- packed into 4 bytes
/// Command     DINT           /
/// Idle_Step   INT            \
///                            |-- packed into 4 bytes
/// Fault_Step  INT            /
/// Init_Step   DINT            4 bytes
/// Timer       TIMER[20]       12 bytes x 20 = 240 bytes
/// ------------------------------------------------------
/// Total size = 264 bytes
///
///
/// In order to understand how the structure is encoded
/// we need to inspect the underlying buffer.
/// Use GetBuffer() from the tag object
/// to access to the raw bytes. Then, use your PLC
/// programming software to manually modify values and see
/// how the raw bytes change.
///
/// If you are accessing an array of your UDT, try starting
/// out by addressing only one element of this array (i.e.
/// set ElementCount = 1).
///
/// </remarks>
public class SequencePlcMapper : PlcMapperBase<Sequence>, IPlcMapper<Sequence>, IPlcMapper<Sequence[]>
{


    // Because our UDT has an unchanging ElementSize,
    // provide the value so the tag constructor can use it
    // If ElementSize = null, this will not be passed to the
    // Tag constructor
    public override int? ElementSize => 264;


    // This function is used to decode the binary buffer
    // into a CLR data transfer object
    // The function is called once per array element, so we only
    // need to decode one array element at a time.
    override public Sequence Decode(Tag tag, int offset)
    {
        var PACKED_BOOLS = tag.GetInt32(offset + 0);
        var bools = new BitArray(new int[] { PACKED_BOOLS });
        var DINT0 = tag.GetInt32(offset + 4);
        var DINT1 = tag.GetInt32(offset + 8);
        var PACKED_BOOLS2 = tag.GetInt8(offset + 12);
        var bools2 = new BitArray(new int[] { PACKED_BOOLS2 });
        var DINT2 = tag.GetInt16(offset + 13);
        var DINT3 = tag.GetInt16(offset + 16);
        var DINT4 = tag.GetInt16(offset + 18);
        var DINT5 = tag.GetInt32(offset + 20);

        var timerPlcMapper = new TimerPlcMapper()
        { PlcType = this.PlcType };                     // Pass the PlcType through to this PlcMapper just in case it's behaviour depends on PlcType


        var TIMERS = new AbTimer[20];
        for (int ii = 0; ii < 20; ii++)
        {
            var timerOffset = offset + 28 + ii * timerPlcMapper.ElementSize.Value;
            TIMERS[ii] = timerPlcMapper.Decode(tag, timerOffset);
        }

        return new Sequence()
        {
            Stop = bools[0],
            Step_No = DINT0,
            Next_Step = DINT1,
            Hold = bools2[0],
            Fault = bools2[1],
            Command = DINT2,
            Idle_Step = DINT3,
            Fault_Step = DINT4,
            Init_Step = DINT5,
            Timer = TIMERS
        };

    }


    override public void Encode(Tag tag, int offset, Sequence value)
    {
        var bools = new BitArray(32);
        bools[0] = value.Stop;
        var DINT0 = BitArrayToInt(bools);
        var DINT1 = value.Step_No;
        var DINT2 = value.Next_Step;
        var bools2 = new BitArray(32);
        bools2[0] = value.Hold;
        bools2[0] = value.Fault;
        var DINT3 = BitArrayToInt(bools2);
        var DINT4 = value.Command;
        var DINT5 = value.Idle_Step;
        var DINT6 = value.Fault_Step;
        var DINT7 = value.Init_Step;

        tag.SetInt32(offset + 0, DINT0);
        tag.SetInt32(offset + 4, DINT1);
        tag.SetInt32(offset + 8, DINT2);
        tag.SetInt32(offset + 12, DINT3);
        tag.SetInt16(offset + 13, DINT4);
        tag.SetInt16(offset + 16, DINT5);
        tag.SetInt16(offset + 18, DINT6);
        tag.SetInt32(offset + 20, DINT7);

        var timerPlcMapper = new TimerPlcMapper();
        for (int ii = 0; ii < 20; ii++)
        {
            var timerOffset = offset + 28 + ii * timerPlcMapper.ElementSize.Value;
            timerPlcMapper.Encode(tag, timerOffset, value.Timer[ii]);
        }

    }

    static int BitArrayToInt(BitArray binary)
    {
        if (binary == null)
            throw new ArgumentNullException(nameof(binary));
        if (binary.Length > 32)
            throw new ArgumentException("Must be at most 32 bits long");

        var result = new int[1];
        binary.CopyTo(result, 0);
        return result[0];
    }
}


/// <summary>
/// Data Transfer Object for the User Defined Type.
/// </summary>
///
/// <remarks>
/// Although it is not absolutely required, it is best
/// practice to here use the same naming and casing as is used
/// in the User Defined Type in the PLC, and to keep these
/// classes as pure Data Transfer Objects.
/// </remarks>
///
public class Sequence
{
    public bool Stop { get; set; }
    public int Step_No { get; set; }
    public int Next_Step { get; set; }
    public bool Hold { get; set; }
    public bool Fault { get; set; }
    public short Command { get; set; }
    public short Idle_Step { get; set; }
    public short Fault_Step { get; set; }
    public int Init_Step { get; set; }
    public AbTimer[] Timer { get; set; }
}
7. STRING结构体标签与深入理解“4字节对齐”规则
PLC除了TIMER这个自带的结构体之外,还有一个更常用的结构体STRING,也就是对应C#中的字符串string。
首先看下在PLC中STRING结构体的内部结构:
名称 DataType
my_str STRING
LEN INT
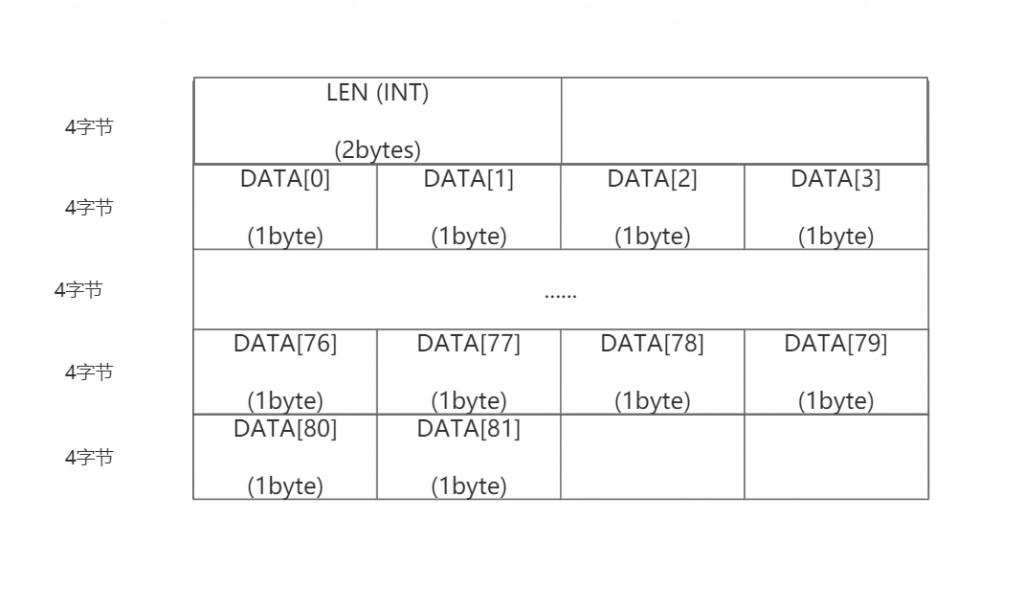
DATA SINT[82]可以看到STRING结构体由一个INT类型的LEN和82个SINT类型的DATA组成。
接着让我们看下在libplctag.NET中是如何对其进行映射的,这里我对源码做了删减,只保留PlcType == PlcType.ControlLogix的情况:
public class StringPlcMapper : PlcMapperBase<string>
{

    const int MAX_CONTROLLOGIX_STRING_LENGTH = 82;

    override public int? ElementSize => 88;


    override public string Decode(Tag tag, int offset)
    {
        const int STRING_LENGTH_HEADER = 4;

        int apparentStringLength = tag.GetInt32(offset);


        var actualStringLength = Math.Min(apparentStringLength, MAX_CONTROLLOGIX_STRING_LENGTH);

        var asciiEncodedString = new byte[actualStringLength];
        for (int ii = 0; ii < actualStringLength; ii++)
        {
            asciiEncodedString[ii] = tag.GetUInt8(offset + STRING_LENGTH_HEADER + ii);
        }

        return Encoding.ASCII.GetString(asciiEncodedString);
    }

    override public void Encode(Tag tag, int offset, string value)
    {
        if (value.Length > MAX_CONTROLLOGIX_STRING_LENGTH)
            throw new ArgumentException("String length exceeds maximum for a tag of type STRING");

        const int LEN_OFFSET = 0;
        const int DATA_OFFSET = 4;

        tag.SetInt16(offset + LEN_OFFSET, Convert.ToInt16(value.Length));

        byte[] asciiEncodedString = new byte[MAX_CONTROLLOGIX_STRING_LENGTH];
        Encoding.ASCII.GetBytes(value).CopyTo(asciiEncodedString, 0);

        for (int ii = 0; ii < asciiEncodedString.Length; ii++)
        {
            tag.SetUInt8(offset + DATA_OFFSET + ii, asciiEncodedString[ii]);
        }
    }
}
可以看到,STRING类型在PLC中占用88个字节,其中长度字符串长度LEN为INT类型,独占4个字节,DATA含有82个SINT类型的数据,各用一个字节存储,由于“4字节对齐规则”最后还需要多占2个字节,所以一共占用88个字节。如下图所示:
因此要注意,在进行STRING类型标签的写入时,字符串长度不能超过82,且PLC只支持ASCII字符。
8. 通用地构建标签实例
从前面的例子也可以看出,对PLC中标签的读写操作,关键就是构建出一个可以与PLC内部标签相互映射的Tag实例,之后再使用Write()方法或Read()方法即可。
这里给出一个通用方法,该方法可以构建用于读写基本数据类型标签、一维数组结构标签、 一维数组结构标签中的特定位置的标签、用户自定义结构体类型标签、 用户自定义结构体类型标签中的特定成员:
public Tag<M, T> BuildTag<M, T>(string tagName, int length = 1) where M : IPlcMapper<T>, new()
{
    Tag<M, T> tag = null;
    try
    {
        tag = new Tag<M, T>()
        {
            Name = tagName,                                     //Name of tag on the PLC, Controller-scoped would be just "SomeDINT"
            Gateway = this.RemoteIPAddress + ":" + ReceivePort, //PLC IP Address and Port
            Path = this.Path,                                   //CIP path to PLC CPU. "1,0" will be used for most AB PLCs
            PlcType = this.PLCType,                             //Type of PLC
            Protocol = this.ProtocolType,                       //Protocol
            Timeout = TimeSpan.FromMilliseconds(this.Timeout),  //A global timeout value that is used for Initialize/Read/Write methods
        };
        if (length > 1)
        {
            tag.ArrayDimensions = new int[] { 1, length };      // 1-dim support-only in this method.
        }
        tag.Initialize();
    }
    catch (Exception)
    {
        tag = null;
    }
    return tag;
}
9. 发现的BUG
(1)BOOL类型标签读取异常
在使用过程中,我发现,其他类型的标签读写都没有问题,唯独BOOL类型的标签读取时,不论PLC中的标签变量值为True还是False,都读取出来的是False,然后我尝试使用sbyte类型去读取bool类型的标签,发现当PLC中标签变量值为True,上位机读取到的是1,当变量值为False时,上位机读取到的是0。因此我们可以使用sbyte类型去读取bool类型的标签。
但这样仍然不够完美,恰巧看到了这个问题有人也遇到过并提了issue:https://github.com/libplctag/libplctag.NET/issues/178
阅读issue及各路大神的解决方案后,我明白了问题的来龙去脉:
其实就是因为我手头上的这款PLC中,True对应的是1,而libplctag.NET中将255认为True,其余认为False,所以就导致了当读取单个bool类型标签时,总是读取的False。libplctag.NET中这部分的源码如下(为了方便展示,删去了读写bool数组的部分):
public class BoolPlcMapper : IPlcMapper<bool>
    {
        public int? ElementSize => 1;

        public PlcType PlcType { get; set; }
        public int[] ArrayDimensions { get; set; }

        public int? GetElementCount()
        {
            if (ArrayDimensions == null)
                return null;

            //TODO: Test -> I'm not confident that the overall bool count is packed as a 1D array and not packed by dimension.
            //Multiply dimensions for total elements
            var totalElements = ArrayDimensions.Aggregate(1, (x, y) => x * y);
            return (int)Math.Ceiling((double)totalElements / 32.0);
        }

        public int? SetArrayLength(int? elementCount) => (int)Math.Ceiling((double)elementCount.Value / 32.0);


        virtual protected void EncodeArray(Tag tag, bool[] values)
        {
            for (int ii = 0; ii < tag.ElementCount.Value * 32; ii++)
            {
                tag.SetBit(ii, values[ii]);
            }
        }

        bool IPlcMapper<bool>.Decode(Tag tag) => tag.PlcType == PlcType.Omron ? tag.GetUInt8(0) != 0 : tag.GetUInt8(0) == 255;  // 问题就出现在这里

        void IPlcMapper<bool>.Encode(Tag tag, bool value) => tag.SetUInt8(0, value == true ? (byte)255 : (byte)0);

    }
解决的方式也很简单,我们自定义一个类型CustomBoolPlcMapper专门用来读取bool即可:
public class CustomBoolPlcMapper : IPlcMapper<bool>
    {
        public PlcType PlcType { get; set; }

        public int? ElementSize => 1;

        public int[] ArrayDimensions { get; set; }

        public bool Decode(Tag tag)
        {
            return tag.GetUInt8(0) != 0;  // 当值为0时读取为False,否则读取为True
        }

        public void Encode(Tag tag, bool value)
        {
            tag.SetUInt8(0, value == true ? (byte)255 : (byte)0);  // 写入没发现问题,因此就没做修改
        }

        public int? GetElementCount() => 1;
    }
之后在需要读写BOOL标签的时候,只需要用这个自定义类型CustomBoolPlcMapper代替BoolPlcMapper即可。
(2)bool数组特定位置的元素读写异常
在上面第3节中接收了如何读写标签集合中的特定位置的元素。但是在实际运行时,发现bool数组的读写会出现问题,猜测也可能是libplctag.NET的bug,期待后续更新解决。目前的解决方法是不使用这种方式,而是整个bool数组一起读写。
10. 其他
前面说到libplctag是由C语言开发的,作者给我们提供了可执行的Release包:https://github.com/libplctag/libplctag/releases,当我们需要进行一些简单的测试时,就可以使用提供的这些可执行程序。例如下面两个是我常用的:
(1)标签读写
tag_rw.exe -t uint32 -p "protocol=ab_eip&gateway=10.206.1.27&path=1,0&cpu=LGX&elem_size=4&elem_count=200&name=pcomm_test_dint_array"- -t:标签类型
- -p:命令参数
- protocol:协议类型
- gateway:下位机IP和端口号
- path:CIP协议的路由路径和CPU插槽
- cpu:PLC类型
- elem_size:标签类型对应字节数
- elem_count:元素数量
- name:标签名
(2)列出所有PLC中的标签
list_tags.exe 10.1.2.3 1,0第一个参数是IP地址,第二个参数是CIP协议的路由路径和CPU插槽。这个命令我常用来查看标签占用的字节数,校验自己的编码。有条件的话,也可以直接在AB的IDE(Studio 5000)中直接查看


请问,怎么写欧姆龙PLC得STRING类型呢,一直报错,读是可以的。
@FCurry 这个库对欧姆龙的支持不太好,我看源码,对字符串的开发还没实现。不过之前我也有用过这个库对欧姆龙读写字符串,我是自己封装了一个StringMapper, 是对字节码直接操作的