1.下载数据集
https://www.robots.ox.ac.uk/~vgg/data/pets/
2.解压数据集
tar -zxf annotations.tar.gz
tar -zxf images.tar.gz
3.运行代码
python oxford.pyoxford.py代码如下,记得修改图像路径:
import tensorflow as tf
import matplotlib.pyplot as plt
import numpy as np
import os
import glob

from tensorflow import keras

#resolve显存不够
gpus= tf.config.experimental.list_physical_devices('GPU')
# tf.config.experimental.set_memory_growth(gpus[0], True)
tf.config.experimental.set_virtual_device_configuration(
        gpus[0],
        [tf.config.experimental.VirtualDeviceConfiguration(memory_limit=1024*4)])

img = tf.io.read_file('/home/linjc/mycode/SegmentDemo/Oxford-IIIT Pet/annotations/trimaps/yorkshire_terrier_99.png')
img = tf.image.decode_png(img)
plt.imshow(img.numpy())
plt.show()

img = tf.io.read_file('/home/linjc/mycode/SegmentDemo/Oxford-IIIT Pet/images/yorkshire_terrier_99.jpg')
img = tf.image.decode_png(img)
plt.imshow(img.numpy())
plt.show()

images = glob.glob('/home/linjc/mycode/SegmentDemo/Oxford-IIIT Pet/images/*.jpg')
annotations = glob.glob('/home/linjc/mycode/SegmentDemo/Oxford-IIIT Pet/annotations/trimaps/*.png')
images.sort(key=lambda x: x.split('/')[-1])
annotations.sort(key=lambda x: x.split('/')[-1])

np.random.seed(2019)
index = np.random.permutation(len(images))
images = np.array(images)[index]
anno = np.array(annotations)[index]

dataset = tf.data.Dataset.from_tensor_slices((images, anno))
test_count = int(len(images)*0.2)
train_count = len(images) - test_count
dataset_train = dataset.skip(test_count)
dataset_test = dataset.take(test_count)
print(test_count)

#根据图片路径读取一张图片
def read_jpg(path):
    img = tf.io.read_file(path)
    img = tf.image.decode_jpeg(img, channels=3)
    return img

#根据图像分割文件路径读取一张图像分割文件
def read_png(path):
    img = tf.io.read_file(path)
    img = tf.image.decode_png(img, channels=1)
    return img

#将输入图片和分割图像文件进行标准化处理
#input_image为待识别的图片,input_mask为分割图像文件
def normalize(input_image, input_mask):
    input_image = tf.cast(input_image, tf.float32)/127.5 - 1 #使图片每个像素对应的值范围在-1至1之间
    input_mask -= 1 #使分割图像文件每个像素对应的可能取值为0、1、2
    return input_image, input_mask

#调用上面三个函数进行图像的读取与处理,返回待识别图像和分割图像文件
def load_image(input_image_path, input_mask_path):
    input_image = read_jpg(input_image_path)
    input_mask = read_png(input_mask_path)
    input_image = tf.image.resize(input_image, (224, 224))
    input_mask = tf.image.resize(input_mask, (224, 224))
    input_image, input_mask = normalize(input_image, input_mask)
    return input_image, input_mask

BATCH_SIZE = 2
BUFFER_SIZE = 100
STEPS_PER_EPOCH = train_count // BATCH_SIZE
VALIDATION_STEPS = test_count // BATCH_SIZE

train = dataset_train.map(load_image, num_parallel_calls=tf.data.experimental.AUTOTUNE)
test = dataset_test.map(load_image)

train_dataset = train.cache().shuffle(BUFFER_SIZE).batch(BATCH_SIZE).repeat()
train_dataset = train_dataset.prefetch(buffer_size=tf.data.experimental.AUTOTUNE)
test_dataset = test.batch(BATCH_SIZE)
print(train_dataset)

for img, musk in train_dataset.take(1):
    plt.subplot(1,2,1)
    plt.imshow(tf.keras.preprocessing.image.array_to_img(img[0]))
    plt.subplot(1,2,2)
    plt.imshow(tf.keras.preprocessing.image.array_to_img(musk[0]))

#weights='imagenet'表示使用在imagenet上训练好的权重
#include_top = False表示只使用卷积基,而不使用全连接部分
covn_base = tf.keras.applications.VGG16(weights='imagenet',
                                        input_shape=(224, 224, 3),
                                        include_top=False)
layer_names = [
    'block5_conv3',   # 14x14×512
    'block4_conv3',   # 28x28*512
    'block3_conv3',   # 56x56*256
    'block5_pool',    # 7x57*512
]
layers = [covn_base.get_layer(name).output for name in layer_names]
# 创建特征提取模型
down_stack = tf.keras.Model(inputs=covn_base.input, outputs=layers)
down_stack.trainable = False

inputs = tf.keras.layers.Input(shape=(224, 224, 3))
o1, o2, o3, x = down_stack(inputs)
x1 = tf.keras.layers.Conv2DTranspose(512, 3, padding='same',
                                     strides=2, activation='relu')(x)  # 14*14*512
x1 = tf.keras.layers.Conv2D(512, 3, padding='same', activation='relu')(x1)  # 14*14*512
c1 = tf.add(o1, x1)    # 14*14*512
x2 = tf.keras.layers.Conv2DTranspose(512, 3, padding='same',
                                     strides=2, activation='relu')(c1)  # 28*28*512
x2 = tf.keras.layers.Conv2D(512, 3, padding='same', activation='relu')(x2)  # 28*28*512
c2 = tf.add(o2, x2)
x3 = tf.keras.layers.Conv2DTranspose(256, 3, padding='same',
                                     strides=2, activation='relu')(c2)  # 256*256*256
x3 = tf.keras.layers.Conv2D(256, 3, padding='same', activation='relu')(x3)  # 256*256*256
c3 = tf.add(o3, x3)

x4 = tf.keras.layers.Conv2DTranspose(128, 3, padding='same',
                                     strides=2, activation='relu')(c3)  # 112*112*128
x4 = tf.keras.layers.Conv2D(128, 3, padding='same', activation='relu')(x4)  # 112*112*128

predictions = tf.keras.layers.Conv2DTranspose(3, 3, padding='same',
                                     strides=2, activation='softmax')(x4)   # 224*224*3

model = tf.keras.models.Model(inputs=inputs, outputs=predictions)

model.compile(optimizer='adam',
              loss='sparse_categorical_crossentropy',
              metrics=['accuracy'])
EPOCHS = 5
history = model.fit(train_dataset,
                          epochs=EPOCHS,
                          steps_per_epoch=STEPS_PER_EPOCH,
                          validation_steps=VALIDATION_STEPS,
                          validation_data=test_dataset)

# model.save('model.h5')
# model = keras.models.load_model('model.h5')
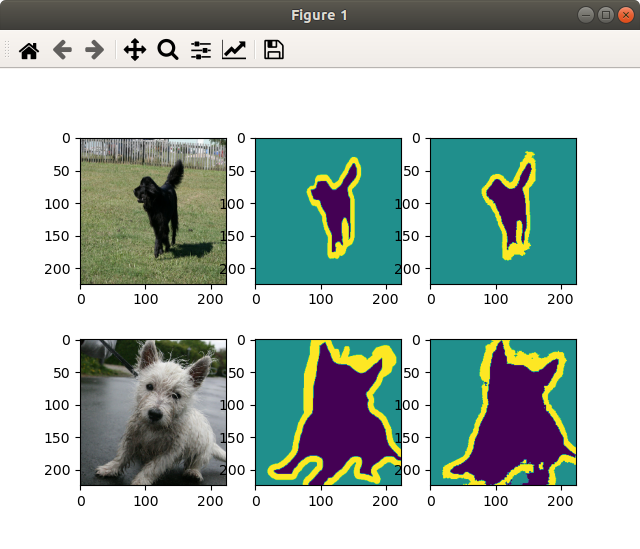
for image, mask in test_dataset.take(1):
    pred_mask = model.predict(image)#通过模型进行预测,输出结果的结构为224*224*3,需要注意的是最后一维是中的“3”是3个概率值,代表该像素分别属于各个类别的概率。
    pred_mask = tf.argmax(pred_mask, axis=-1)#取最后一维的最大值,即取最大概率值的类别。
    pred_mask = pred_mask[..., tf.newaxis]#pred_mask的结构为224*224*1

    num = len(image)
    # plt.figure(figsize=(10, 10))
    for i in range(num):
        plt.subplot(num, 3, i*3+1)
        plt.imshow(tf.keras.preprocessing.image.array_to_img(image[i]))
        plt.subplot(num, 3, i*3+2)
        plt.imshow(tf.keras.preprocessing.image.array_to_img(mask[i]))
        plt.subplot(num, 3, i*3+3)
        plt.imshow(tf.keras.preprocessing.image.array_to_img(pred_mask[i]))
    plt.show()
4.结果

5.踩坑
5-1.CUDA_ERROR_OUT_OF_MEMORY: out of memory
显存不足。参考https://www.tensorflow.org/guide/gpu解决官方教程提到了两种限制 GPU 内存增长的方法
第一种方式是仅在进程需要时才增加内存使用量:
gpus= tf.config.experimental.list_physical_devices('GPU')
tf.config.experimental.set_memory_growth(gpus[0], True)但不知为什么在我这台设备上不起作用,使用命令nvidia-smi -l可以看到在训练始就会分配几乎所有的显存,之后使用了第二种方式,直接设置分配的显存大小才成功。
tf.config.experimental.set_virtual_device_configuration(
        gpus[0],
        [tf.config.experimental.VirtualDeviceConfiguration(memory_limit=1024*4)])


评论 (0)